All Glass, No Bezel
- iOS
Just today I realized how much better OLED screens are vs. LCD ones in the sun. I could easily read messages on my watch compared to my phone (both were on max brightness).
I have high hopes for the (presumed) lack of Touch ID because I can see how this added level of magic will be a (smaller) jump in convenience. It’s sort of like how Apple Watch unlocking unnecessarily promotes laziness (both taking breaks and typing)!
The dual camera system takes stunning pictures and would be amazing if it becomes available in the regular-sized phone. However this would be challenging to fit in a device where the screen takes up a much larger proportion of space.
On a similar note, Steve Jobs theatre also has no bezels, which is pretty fitting. Looking forward!
Reloading Frenzy
- iOS
I am really excited that Frenzy 3.0 was launched this week. This major release introduced a new UI to make sales and Drops more discoverable. Amongst all the new features and polish, I am really proud of the custom refresh animation that I worked on. Here I explain the journey from prototype to completion.
click to play
CAShapeLayer is amazing because it provides any easy way to animate stroking a path by adjusting the strokeStart and strokeEnd properties. My first thought was to Google “uifont to cgpath” and, of course, the first link was to an SO post with a simple function to do just that.
However there were two main problems:
- The Frenzy logo is based on a font but has modifications to combine the “f” and “r” done in Illustrator, so we couldn’t just use the font directly.
- And even if we could, the path generated by this function represents the outline of the letter. This means that when the renderer tries to animate filling the path, it has no idea which pixel should or shouldn’t be filled for the current keyframe, which results in all-or-nothing fills.
I knew the best result would be if the letters were stroked. Nevertheless, I began making a prototype using the SO code to see far I could get with as little custom code as possible.
I created a playgrounds file which animated the drawing of a single letter. Having a grasp of the concept, I then created separate layers for each letter. Since the canonical version of the logo that we had was in Illustrator, I generated the bezier paths using PaintCode, which was a timesaver. This is how it looked:
click to play
Although a bit better than the default spinner, this wasn’t in line with the frenzy brand - the use of an outline and white fill looked out of place
Solution
The real problem was that we needed some way of representing the stroke path of the letters. Although we probably could have created a replica of the logo by combining (many!) bezier curves with varying line widths and animating it, this would be a lot of effort and detail for an animation that will be displayed fairly small in size.
Instead we can get a very good approximation by stroking the rough path of the letters and clipping to the actually outline of the logo. At the size that the custom refresh was being displayed, this was good enough.
More Polish
Again, using CAShapeLayer makes it really easy to tie the tableview scroll offset with the stroke-completion amount. Although not obvious, the timing for the erase-then-stroke animation was heavily tweaked so that it paused long enough to emphasize the logo, but quick enough so it wouldn’t become cliché. Lastly, the logo will always complete the full animation loop before being hidden, even if data came back midway in the animation cycle. This gives the impression that each animation is deliberate and refined.
I have always loved working on the subtle polish features that create an ah-ha moment for users. I am very proud for this to be my finale feature in both senses of the word. The past year has been filled with great memories and experiences with the whole team. I enjoyed every moment and learned a lot in every aspect. Although I will miss the team, I know they will continue to iterate on the product and gain new collaborations. I look forward to seeing what’s yet to Drop.
Keyboard Shortcuts
- Workflows
Prologue: PSA
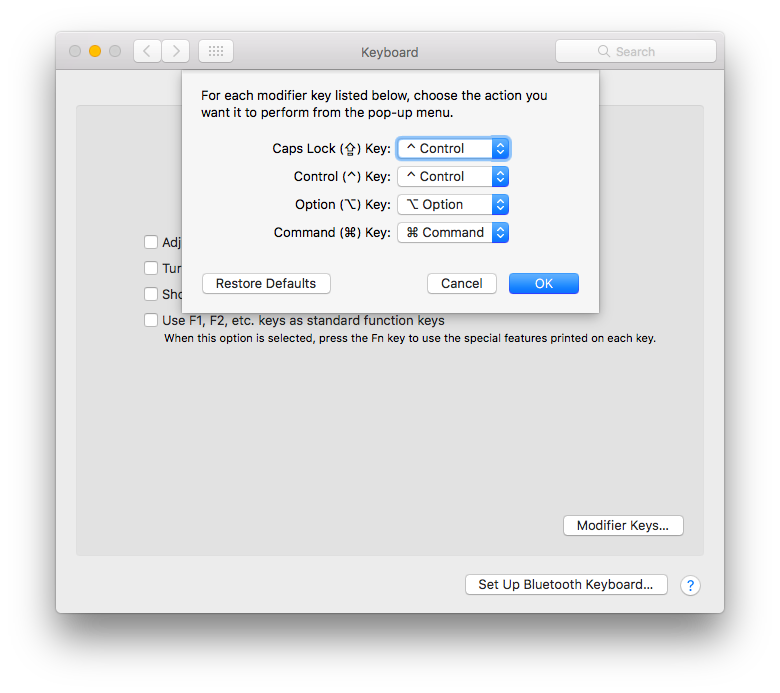
The Control key plays a fundamental role in a lot of shortcuts but it resides in a position that requires people to stretch their tendons. Not good if you want to avoid RSI issues! Instead, you can map the Caps Lock to the Control key, which is really straightforward on the Mac.
Keyboard shortcuts are a big part of my workflow since minimizing mouse-keyboard switching saves a lot of time and fatigue. Here’s a list of the shortcuts I find the most useful.
Text fields
- Control-F
- Move cursor forward one character
- Control-B
- Move cursor backward one character
- Control-P
- Move cursor up one character
- Control-N
- Move cursor down one character
- Control-A
- Move cursor to beginning of line
- Control-E
- Move cursor to end of line
- Control-K
- Delete entire line after cursor
- Control-O
- Insert new line after cursor
Sublime Text 3
- Command-D
- Selects entire word at cursor. Really useful for quickly selecting and deleting a word. (Keep pressing to expand selection to next occurrence.)
- Command-K [U/L]
- Converts selected text to Upper / Lower case
- Command-T <file name>
- Quickly open a file by name
- Control-1
- Selects the first group. You can also use 2, 3, … if you have more groups
- Control-Tab
- Alternates between last used tab (like a stack)
- Control-G <line number>
- Go to line number. Very useful for navigating to somewhere far away without using the mouse
- Control-Minus
- Jumps back to previous cursor position. Great if used in combination with above. You can use Ctrl-Shift-Minus to jump forward
- Control-T
- If you have multiple selections, this shortcut will “rotate” the selection round-robin style. (If you have two selections it swaps them)
- Control-Shift-J
- Reveal current file in sidebar. I remapped this to be the same as the default shortcut combination in Xcode
- Control-R
- Switches to matching header/implementation file. This was a lot easier to press compared to the default Command-Option-Up
Finder
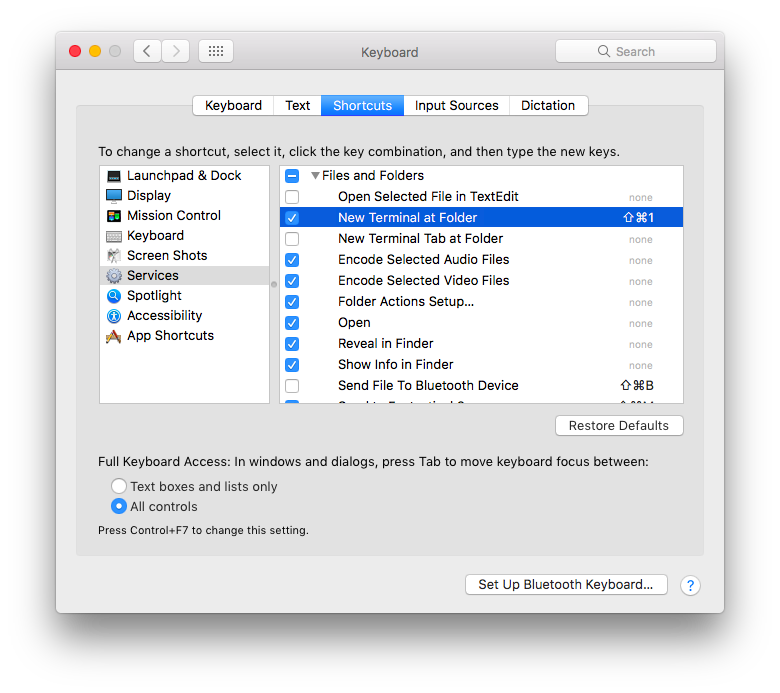
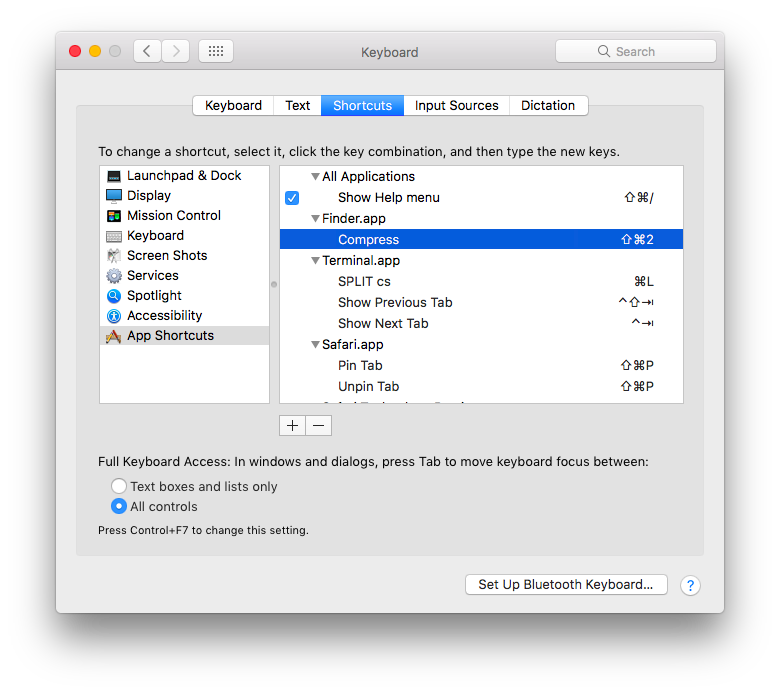
See the Instructions below for setting up these custom shortcuts.
- Command-Shift-1
- Open terminal at selected folder. Unfortunately this requires actually selecting a folder. If anyone knows how to do this without selecting please let me know!
- Command-Shift-2
- Create a ZIP archive of selected files.
Xcode
The first three shortcuts are very useful complements to each other:
- Command-Shift-J
- Show current finder in sidebar
- Command-Shift-C
- Move cursor to console area
- Command-J
- Move cursor to code editor
- Command-Control-R
- Continue running (when stopped at breakpoint)
- Command-Shift-O
- Open Quickly any file. (Vastly improved to add emacs support in Xcode 9!)
Custom shortcuts:
- Option-Shift-S
- Select iPhone SE simulator as destination
- Option-Shift-6
- Select iPhone 6 simulator as destination
- Option-Shift-J
- Select my iPhone as destination
Instructions
Course Evaluations - Winter 2017
- University
I wanted to jot down my thoughts about taking 6 courses while working part-time. There’s the saying that “marks don’t matter” which I think has some truth. However some courses are quite foundational and important in software development, and these courses do matter. The saying applies more to courses that are subjective or depends on the specific context, or where the real-world practice is actually nothing like the theory taught in class. There’s no consistent method to measure students’ performance because there are too many factors in the real-world to write down in a two hour exam.
Bu 423 - Options, Futures, and Swaps
I’ve always been interested in learning about how to trade stocks as a form of passive income. This course gave me a better sense of the connection between stocks and options, as well as how financial institutions make their money (seriously, right?). The most interesting realization for me was how Principal-Protected Notes work.
Bu 481 - Policy 1
This is my favourite business course by far for a couple of reasons. It consists primarily of real-world cases which provided a more practical learning compared to previous courses. This also makes it more engaging because these cases illustrated the decisions that companies actually had to figure out.
CS 350 - Operating Systems
This course is the culmination of the two pre-requisites on computer CPU architecture and basic compilers. For me this course eliminated the mystery of what operating systems actually do. It allowed me to understand things like what does it mean for 64-bit processors to have 4 levels of page tables (and some security implications), or reading through the reverse-engineered specs of APFS designed for modern SSD’s. Well then, time to re-read objc.io Concurrency :).
CS 370 - Numerical Computation
Before taking this course I didn’t think open-book exams existed in university math courses! I didn’t know what to expect - would the exam be a lot of theory since anyone can lookup all the proofs? Well, turns out it was fairly similar to other courses where questions are mostly based off of assignments.
This course covered a whole range of topics. My favourites in order are 1) details of how Google PageRank works, 2) creating splines, and 3) Fourier transforms. An honorable mention goes to LU Decomposition because I thought it was a good example how pre-computing an expensive result can be worth it in the long-run.
CS 486 - Artificial Intelligence
I have to admit I should have put more effort into this course. The main reason was my loathing of stats - I like the power of the concepts but I’m terrible when it comes to theory. The programming assignments would have been a lot more fun if I started on them earlier. This course gave me a better understanding of how the “intuitive” algorithms that we think up actually works and cleared away some of the mystery behind how to write and train programs with data. The “Utility function” was a common theme in AI, which made sense since there needed to be a canonical way of measuring the value of an outcome. It also shows how stats is used pretty much everywhere. Guess people are going to start bringing their own poker AI to casinos now?
Econ 250 - Macroeconomics
I’m thankful that I also selected an easier course this term. Most of the early chapters were a review of basic economic concepts. With this being an online course, the weekly quizzes, although only 1% each, were very helpful in forcing me to keep up with the content. I think having a basic understanding of economics is one of the most useful subjects as it provides the foundational knowledge to evaluate business decisions and the general economy.
What Are Principal-Protected Notes?
- Finance
I heard that some banks offer you these “safe” investments when you sign up, but what are they really? Essentially, at maturity, it guarantees that you will receive the amount you invested in, plus some non-negative amount depending on how well the market performs. For example if you invest $1000 for one year, you might receive $1050 or $1100, but nothing less than $1000.
But I thought investing was risky?
You might be thinking: How is it possible that both 1) the initial investment is protected, and 2) the bank makes money, at the same time? The short answer is: There is the risk that inflation is eating your investment.
Here’s what this security is actually made up of: The bank buys a zero-coupon bond and some options, and keeps the remainder as commission. The zero-coupon bond guarantees the principle at maturity, while the options provide the chance of additional returns. Zero-coupons will always cost less to purchase than the principle. The remainder of the initial investment is used to buy options or kept by the bank as commission. Notice that this is a fixed-pie, where banks have the incentive to keep more as commission.
Is it worth it?
The returns of this strategy is largely dependent on the current interest rates. A high interest rate means that the zero-coupon bond is less expensive to purchase, which leaves more money available to buy options. However a higher interest rate might reduce returns of the market in the long-term, limiting the potential upsides of this strategy. On the other hand, a lower interest rate increases the cost of the zero-coupon, leaving less money to buy the leveraged options. And don’t forget - the bank will take a cut of your investment as commission! Now you might be thinking, I will just create this strategy by buying bonds and options myself right? Well that might actually cost more in commissions because that requires two transactions. So in most cases it might actually be better choose a different strategy!